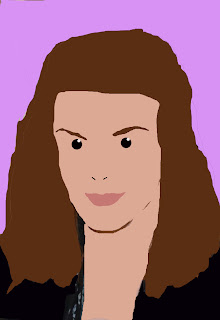
The whole idea of this task was to create a portrait of ourselves in the style of the british artist Julian Opie .
Firstly a used an original image of myself and opened it up into photoshop, I then selected the main part of the image I wanted to focus on by using the marquee selection tool, then I opened a new layer and pasted my selected photo into it which has been resized by using the selection tool.
The first element i worked with was my hair so I had to make another layer to produce it in and I used the lasso tool to trace around my hair area, I used the colour palette to select the correct colour before using the paint bucket to fill it in.
Next I created a new layer which i named face and again used the lasso tool which was a tricky part because it had to be perfectly shaped, Again I chose the correct colour before filling my face, the neck was created in the same way and by using the same colour.
Layer four consisted of eyes, I used the pencil tool to create a small diameter width which will go well with the overall effect, it was another tricky part because I needed to make sure it was the right size to cover my full eye but also have the correct effect I was looking for. I then selected a smaller brush to create a white dot inside my eye to have the character effect.
The eyebrows were layer five and I had to select the lasso tool once again to trace one eyebrow but the shift key was used to trace the other so it had more of a perfect shape. I filled the colour in again with the paint bucket tool.
Lips were the next feature I worked on and it was the same technique as the rest of the process I just used the lasso tool to trace my mouth then selected the correct colour before filling it with the paint tool.
I made another layer to fill in my clothing which give it more of a textured effect before finally adding a new layer with a background colour to take the noisy background away that was already there.

No comments:
Post a Comment